Dental implants have become one of the most advanced and effective solutions for replacing missing teeth, offering a permanent, natural-looking alternative to traditional dentures or bridges. Whether you’ve lost teeth due to injury, decay, or other dental conditions, implants can restore both functionality and aesthetics, allowing you to regain confidence in your smile and enjoy a comfortable chewing experience. But for anyone new to the idea of dental implants, the process may seem complex, leading to many common questions and concerns.
In this comprehensive FAQ guide, we aim to clear up any confusion by addressing the most frequently asked questions about dental implants. If you’re considering this treatment or are simply curious about the procedure, this introduction will help you gain a deeper understanding of what dental implants are, how they work, and what to expect throughout the journey. Click here to know more about dental implant cost.
How dental implants are done
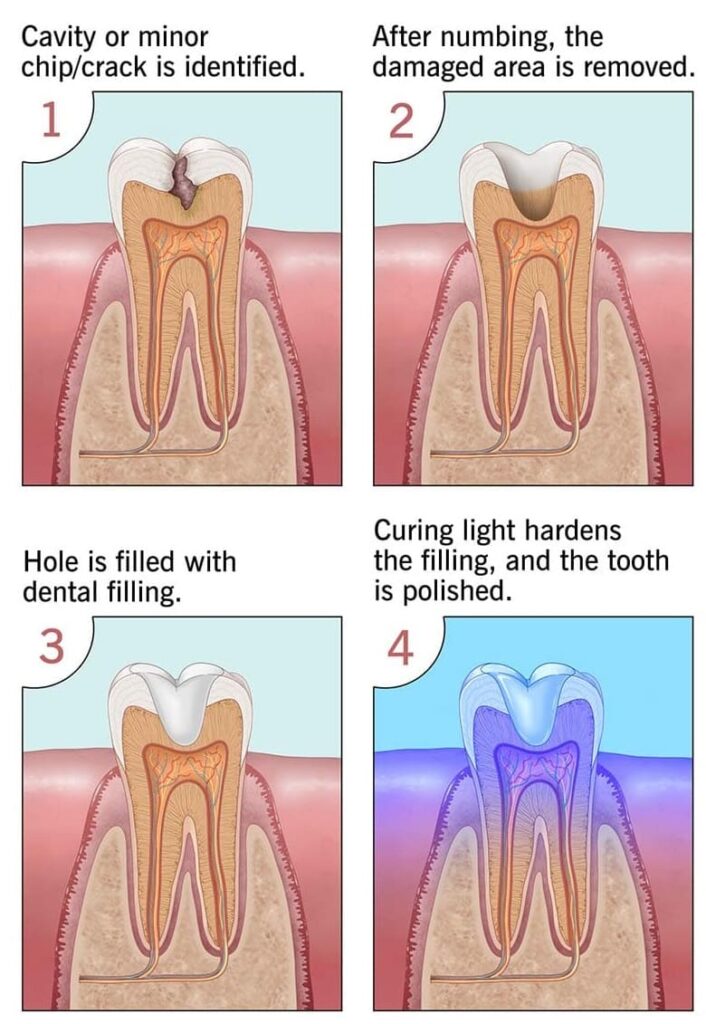
Dental implants are a multi-step procedure designed to replace missing teeth with artificial ones that look, feel, and function like natural teeth.
“The process typically takes several months, and it involves three main phases: initial evaluation and preparation, the surgical placement of the implant, and the final restoration”.
Step 1:
The first step is a thorough evaluation by a dentist or oral surgeon to determine whether the patient is a good candidate for dental implants. This includes a review of medical history, dental health, and imaging, such as X-rays or 3D scans, to assess the condition of the jawbone. Adequate bone density is essential because the implant needs to be securely anchored in the bone. If a patient has insufficient bone in the jaw, a bone graft may be necessary to build up the area, which can add several months to the overall timeline but ensures a stable foundation for the implant.
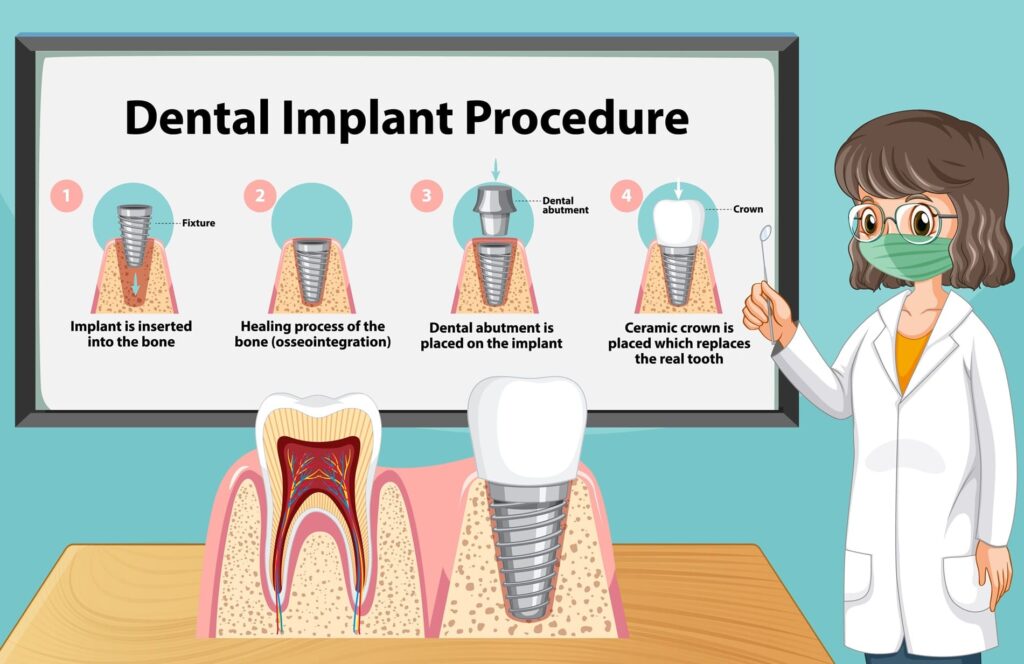
Step 2:
Once the evaluation is complete and the jawbone is determined to be strong enough, the surgical placement of the implant begins. During this procedure, the patient is typically under local anesthesia, though sedation is also an option for those who are anxious or undergoing a more complex surgery. The dentist or oral surgeon will make a small incision in the gum tissue to expose the jawbone. A hole is then carefully drilled into the bone where the implant, which is usually a titanium post, will be placed. This titanium post acts as an artificial tooth root, and its biocompatible properties allow it to fuse with the bone through a process called osseointegration. This fusion is critical, as it provides the implant with the stability and strength needed to support a replacement tooth. After the implant is placed, the gum tissue is stitched back together, and the healing process begins.
The healing phase, also known as the osseointegration period, typically takes several months—usually between three to six months—depending on the patient’s bone quality and overall health. During this time, the implant gradually integrates with the surrounding bone, becoming a permanent part of the jaw. It is crucial to allow this process to fully occur before moving on to the final phase, as a strong bond between the bone and implant is essential for long-term success. In some cases, a temporary crown or bridge may be placed during this period to maintain aesthetics and function while the implant heals.
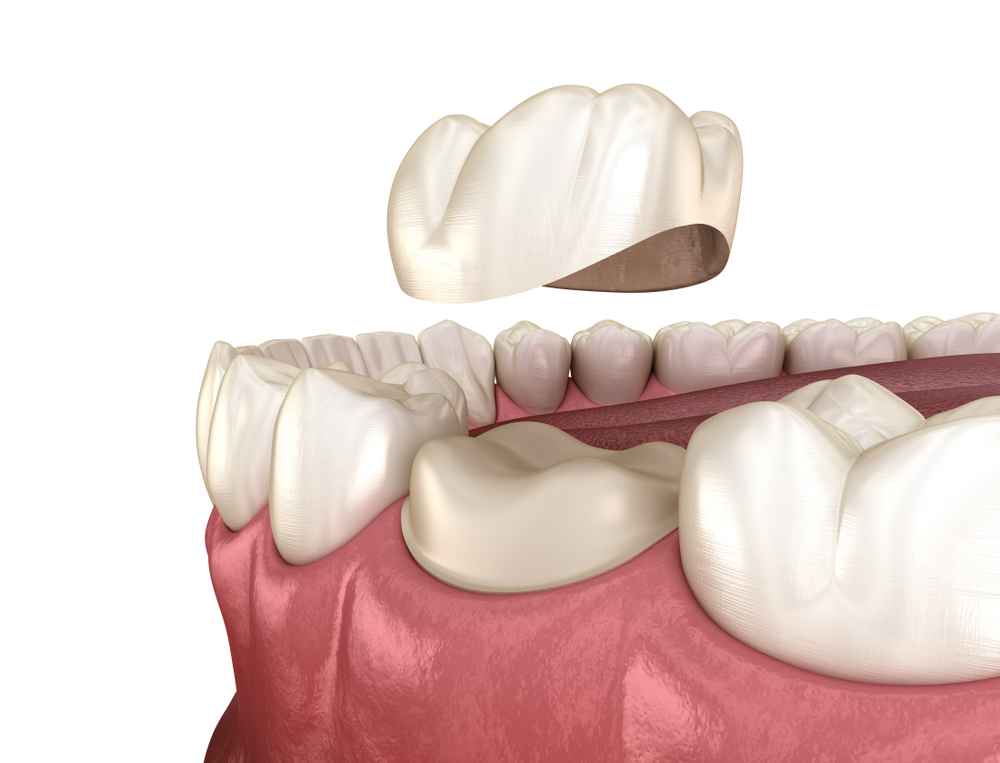
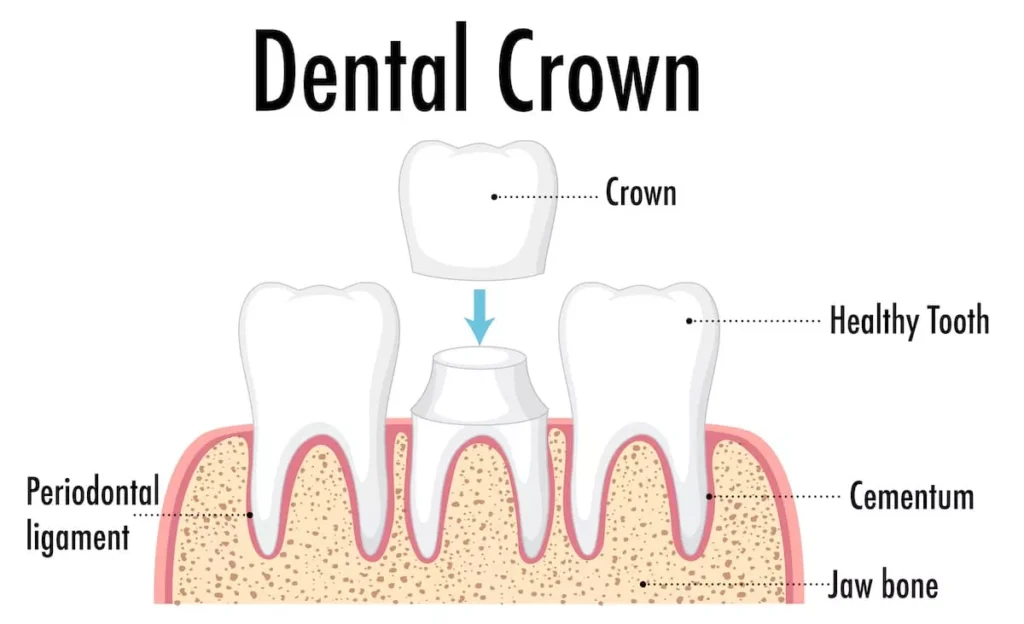
Step 3:
Once the implant has fully integrated with the jawbone, the final phase of the procedure can begin. This involves attaching an abutment, which is a small connector piece that links the implant to the crown, bridge, or denture. The dentist reopens the gum to expose the top of the implant, then attaches the abutment. After this, a custom-made crown, designed to match the color, shape, and size of the surrounding natural teeth, is placed onto the abutment. This crown will serve as the new artificial tooth. Once the crown is securely attached, the dental implant is complete, and the patient can enjoy a fully functional, aesthetically pleasing tooth replacement that can last for decades with proper care.
Are dental implants safe
“Dental implants are widely regarded as a safe and effective solution for replacing missing teeth”.
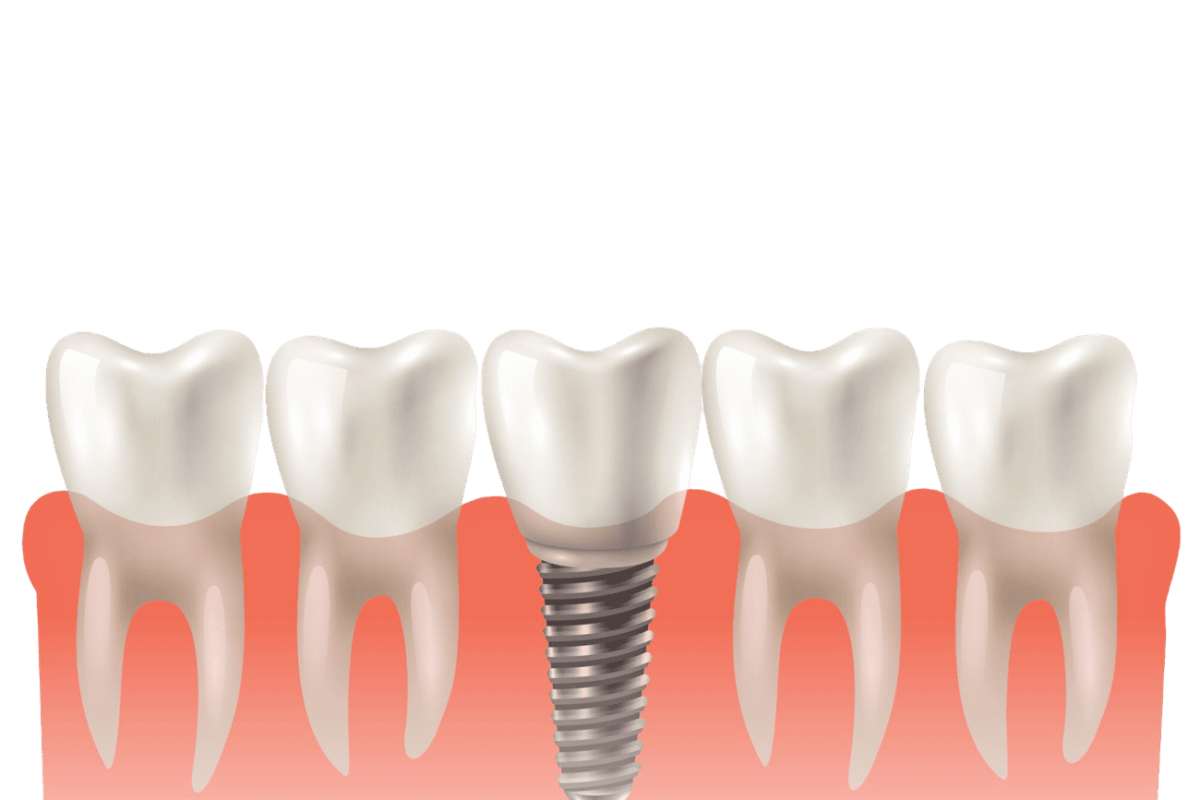
The primary component of a dental implant is a titanium or zirconia post that is surgically inserted into the jawbone to act as an artificial tooth root. This biocompatible material ensures that the implant is not rejected by the body, making it a safe option for most people. In fact, the biocompatibility of titanium, a material commonly used in many other medical implants, is one of the key reasons for its safety and high success rate, which exceeds 95% for most patients.
One of the most common questions about dental implants relates to potential risks. While dental implants are safe for the majority of patients, as with any surgical procedure, there are some risks and complications that should be considered. These include infection at the implant site, nerve damage if the implant is placed too close to a nerve, and sinus problems if the implant extends into the sinus cavity. However, these complications are relatively rare, especially when the procedure is performed by a qualified and experienced dentist or oral surgeon. To further minimize risks, dentists typically use advanced 3D imaging and computer-guided surgery to ensure that the implants are placed with precision.
Another concern is whether patients with certain medical conditions are suitable candidates for dental implants. Individuals with chronic conditions like diabetes or heart disease may need additional evaluation to determine their suitability.
“Smokers and individuals with gum disease may also face a slightly higher risk of implant failure, as these conditions can interfere with the healing process”.
Nonetheless, even patients who initially lack sufficient bone in the jaw may still be able to receive implants after a bone graft, which can increase bone density and improve the chances of successful osseointegration.
Which dental implant is best
When considering dental implants, it’s natural to wonder which type is best suited for your needs. The “best” dental implant varies depending on several factors, including your dental health, the number of teeth being replaced, your bone density, budget, and personal preferences. Dental implants come in different materials, sizes, and types, each offering unique advantages.
“The most common types of dental implants are endosteal implants, subperiosteal implants, and zygomatic implants, and they can be made from different materials such as titanium or zirconia”.
Type 1: Endosteal implant
The most widely used type of dental implant is the endosteal implant. These implants are typically shaped like small screws or cylinders and are surgically placed directly into the jawbone. Made primarily of titanium, they are known for their durability and high success rate, as titanium is biocompatible and fuses well with bone through a process called osseointegration. This integration makes endosteal implants very stable and long-lasting. They are the best option for most patients with healthy jawbones, as they provide a secure foundation for single crowns, bridges, or even full-mouth restorations.
Type 2: Subperiosteal implant
For patients who lack the bone density required to support endosteal implants or who cannot undergo bone grafting, subperiosteal implants may be a better option. Unlike endosteal implants, which are placed into the jawbone, subperiosteal implants sit on top of the bone but underneath the gum tissue. A metal frame is placed beneath the gums, and as the gums heal, the frame becomes fixed to the jawbone. Posts attached to the frame protrude through the gums and hold the replacement teeth in place. Subperiosteal implants are less common today due to advancements in bone grafting techniques and endosteal implant success rates, but they are still a good alternative for individuals who cannot support traditional implants due to bone loss or other anatomical concerns.
Type 3: Zygomatic implant
Zygomatic implants are the least common and most complex type of dental implant. These are used when there is not enough bone in the upper jaw for endosteal implants and even bone grafting may not be a feasible option. Instead of being placed in the jawbone, zygomatic implants are anchored in the cheekbone, which is denser and offers a solid foundation for support. This type of implant is often used in cases of severe bone loss, particularly in the upper jaw. Zygomatic implants are a specialized option, usually reserved for complex cases where other implant types are not viable. While they offer a solution for patients with extreme bone deficiencies, they require a highly skilled and experienced oral surgeon to perform the procedure successfully.
Titanium and Zirconia implants
In addition to the types of implants, the material from which the implant is made also influences the best option for each patient. Titanium implants are the most commonly used due to their strength, durability, and ability to fuse with the bone. They are also highly biocompatible, meaning they are less likely to be rejected by the body. However, for patients with metal allergies or sensitivities, zirconia implants offer a metal-free alternative. Zirconia implants are made from ceramic material and are known for their aesthetic appeal, as their white color closely resembles natural teeth. They are also strong and biocompatible, but zirconia implants lack the long-term clinical history that titanium implants have, so their success rates are still being evaluated.
Will dental implant affect mri
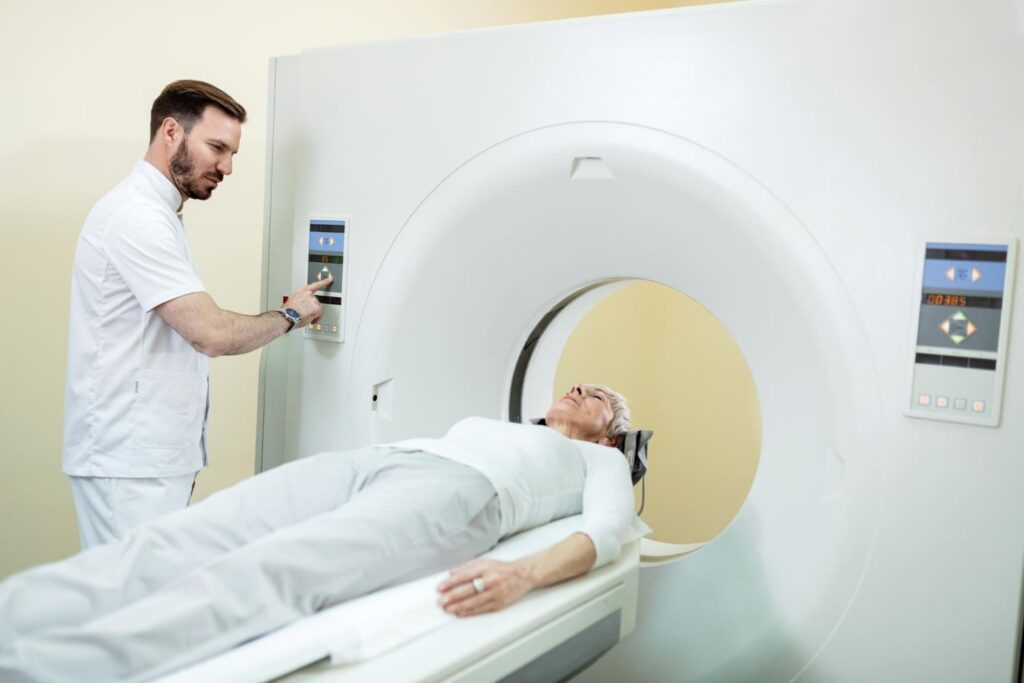
Dental implants generally do not affect MRI (Magnetic Resonance Imaging) scans in a significant way, but there are a few factors to consider. Most dental implants are made of titanium or zirconia, both of which are biocompatible and non-magnetic materials. Titanium, the most commonly used material, is not affected by the magnetic field of an MRI machine, which means that it won’t interfere with the imaging process or pose any risk to the patient during the scan. Zirconia implants, which are metal-free, are also MRI-safe. Therefore, for the majority of people with dental implants, undergoing an MRI is perfectly safe and will not alter the results of the scan.
However, it’s important to note that dental implants may cause slight image artifacts, particularly in the area of the mouth and jaw where they are located. This means that if the MRI scan is focusing on regions near the implant, such as the head or neck, there could be some distortion or loss of detail around the implant site. These artifacts are usually minimal and do not typically hinder the overall diagnostic process, but it is something your radiologist and doctor will be aware of when interpreting the images.
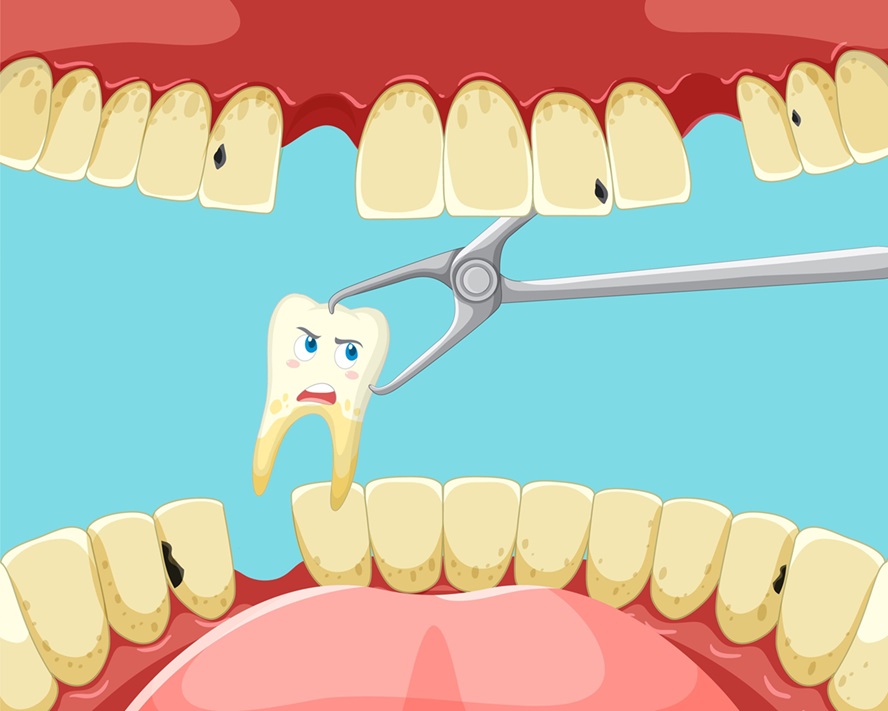
Can dental implant be removed
Yes, dental implants can be removed, but the process is more complex than the initial placement.
Dental implants are designed to be a permanent solution for tooth loss, as they integrate with the jawbone, where the implant fuses with the surrounding bone. This provides a stable and long-lasting foundation for replacement teeth. However, in certain cases, implant removal may be necessary due to complications such as infection, implant failure, bone loss, or damage to surrounding tissues. In rare instances, an implant might also be removed to adjust its position or replace it with a newer model.
The removal process requires careful surgical intervention by an experienced oral surgeon or periodontist. Because the implant is firmly embedded in the bone, removing it involves delicately separating the implant from the bone tissue. The surgeon may use specialized tools to safely extract the implant without causing unnecessary damage to the surrounding bone or gum tissue. In some cases, a portion of the bone may need to be reshaped or repaired after removal, especially if there has been bone loss or infection. Bone grafting may also be required to rebuild the area and prepare it for future implant placement, if desired.
While removing a dental implant is possible, it is generally considered a last resort after all other options to save the implant have been exhausted. After removal, if the bone and gum tissue heal properly, a new implant can often be placed, allowing the patient to continue enjoying the benefits of a functional, natural-looking replacement tooth.
Dental implants versus bridges
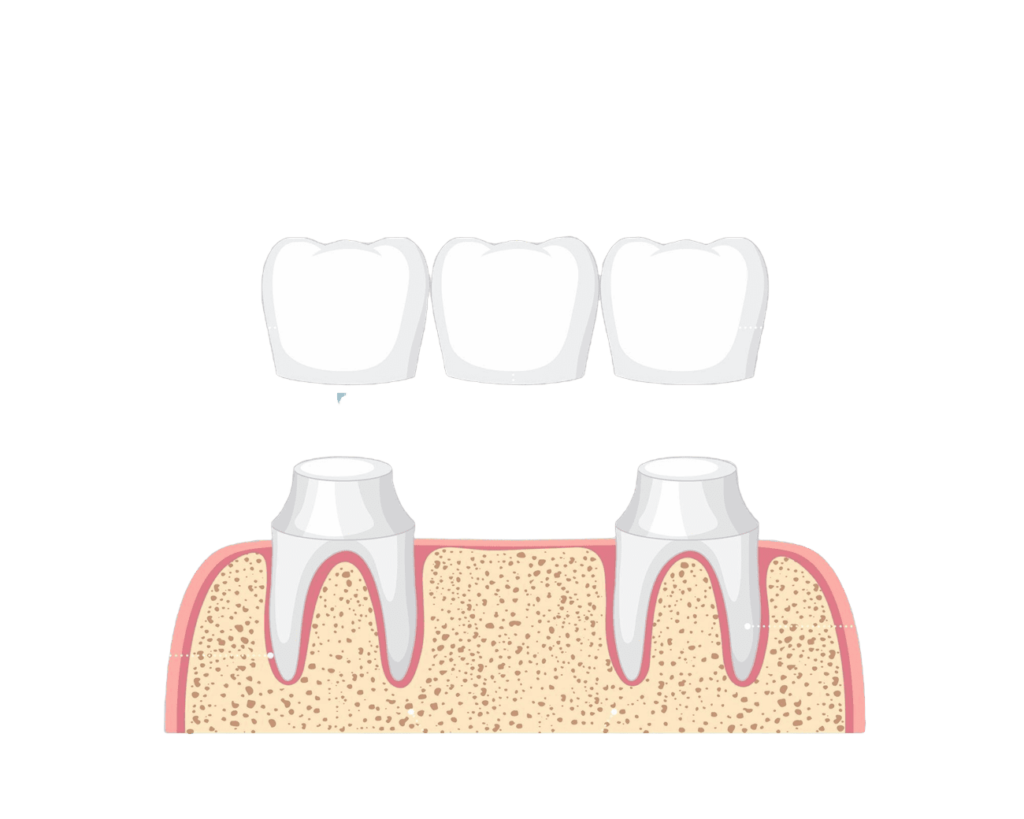
When choosing between dental implants and bridges, it’s important to consider both the advantages and disadvantages of each option. Dental implants and dental bridges are two common solutions for replacing missing teeth, but they differ significantly in terms of function, longevity, and the impact on surrounding teeth.
Dental implants are artificial tooth roots made of titanium or zirconia that are surgically placed into the jawbone, providing a permanent foundation for a crown. The implant integrates with the bone through osseointegration, making it a durable and stable option that can last a lifetime with proper care. One of the main advantages of implants is that they function like natural teeth, allowing for normal chewing and speaking. They also help preserve bone structure by stimulating the jawbone, preventing bone loss that often occurs after tooth loss. Additionally, implants do not affect adjacent teeth, as they are placed independently of surrounding teeth.
Dental Bridges
In contrast, dental bridges involve placing a false tooth (or teeth) in the gap created by missing teeth, anchored by crowns on the adjacent natural teeth. While bridges offer a quicker and less invasive solution compared to implants, they require the preparation and reshaping of the neighboring teeth, which can weaken them over time. Bridges typically last between 10 to 15 years before they need replacement, while implants have the potential to last much longer. Another disadvantage of bridges is that they do not prevent bone loss in the jaw, since they do not engage with the bone like implants do.
“Ultimately, dental implants are often considered the superior option for long-term tooth replacement due to their durability, ability to preserve bone, and minimal impact on adjacent teeth. However, bridges may be preferable for patients who are not suitable candidates for surgery or who prefer a faster, more affordable solution”.